Uniden Scanner Guide
Bearcat BC125at
Program your own scanner
(Last updated: 7/17/2025)
1. Gear
Uniden Bearcat BC125AT Equipment and Gear
- (~$106) – Uniden Bearcat Scanner (NOT a 2-way radio, uses normal 3.5mm / 1/8″ headphone jack)
This option includes everything in a single purchase that you need to program your scanner. You only need to add earbuds or headphones (wired)
Optional Extras (Will work with any set of scanners/radios)
Headphones
- (~22) – in-Ear Monitor Style Earphones (IN MY KIT)
- (~$40) – Bluetooth Hearing Protection (IN MY KIT)
- (~$34) – Howard Leight Noise-Blocking Earmuff
- (~$75) – Walker's Shooting Training Protection 29 DB Omni-Directional Microphone Rope Hearing Enhancer Earbuds
- (~$104) – Howard Leight Radio and MP3 Ear Muff (AM/FM/MP3) (Seriously, not required! Earbuds do work. But these are kind of cool!)
- (~$22) – 3M Peltor Earmuff (hearing protection only- bring your own earbuds)
- (~$350) – Pair of headphones with ability to link and talk to each other, and share scanner or run a different one per headset. Expandable beyond two.
- (~$1) – Earbuds – use your own, and then add some standard headphone ear protection (safety, and better ability to hear radio transmissions)
Adapters
- (~$6) – Splitter to share one scanner with someone else
- (~$7) – Splitter (another option)
- (~$22) – Headphone Amp: If you're going the ear-bud only route, you might find it isn't loud enough when the cars are running. This amp (about the size of a deck of cards) can boost your volume higher.
Alternatives
- (~$15) – Bluetooth Transmitter: Plug this into the headphone port of the scanner, and use your BT Earbuds or BT headphones, to have a wireless experience.
2. software
Uniden Bearcat BC125AT Software and Drivers
The drivers and software used to program your BC125AT can be found on the Uniden website. You will want the USB drivers and the programming software.
You Will Need
- PC Programming Software: http://info.uniden.com/twiki/pub/UnidenMan4/BC125AT/BC125AT_SS_V1_03_00.zip
- If the links to zip files aren’t working, please either copy/paste the link from above, or try visiting the Uniden Website directly
You Might Need
- USB Drivers (Windows): http://info.uniden.com/twiki/pub/UnidenMan4/BCD536HP/Windows_Serial_Drivers.zip
- USB Drivers (other): http://info.uniden.com/twiki/pub/UnidenMan4/BC125AT/BC125AT_USB_driver.zip
- Owners Manual: http://info.uniden.com/twiki/pub/UnidenMan4/BC125AT/BC125ATom_07262012.pdf
- (If the links to zip files aren’t working, please either copy/paste the link, or try the Uniden Website)
3. Program
Once you’ve installed the programming software, it’s time to input frequencies. You can use my list to enter them in yourself, or just download my config file for the BC125AT, since the work has already been done!
- Frequencies Coming Soon…
Programming Step-by-Step - Using a PC
Programming the BC125AT by hand couldn’t be easier. It’s one of the reasons I recommend this scanner over the Baofeng route, because everything JUST WORKS right out of the box. No extra cables to buy, no weird drivers that don’t quite work and you have to fuss with. It works. So after you install the one driver and the programming software (See step 2) it’s time to put in the drivers and their frequencies.
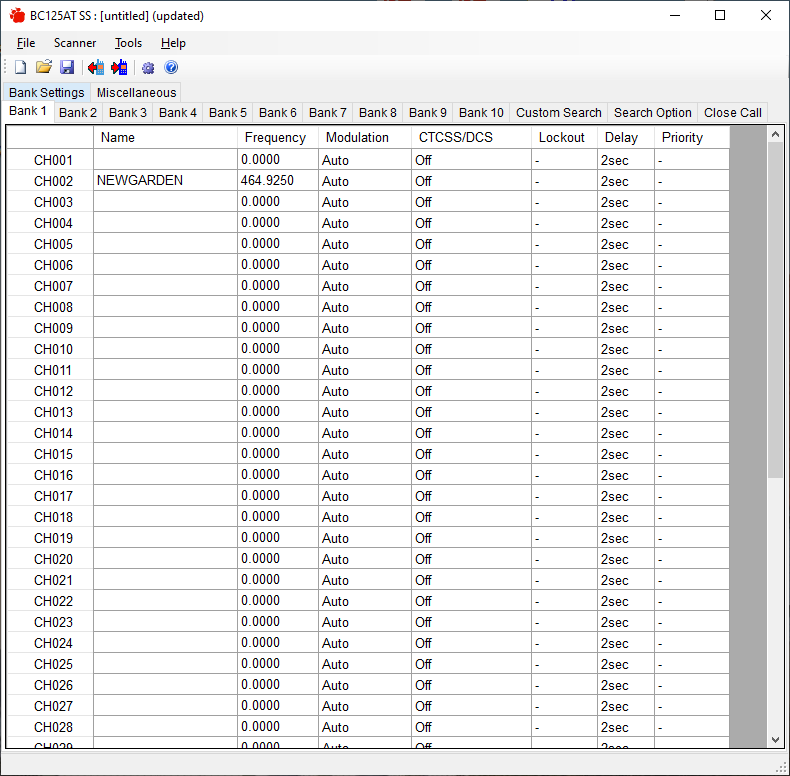
The scanner (and therefore the software) is split into 10 banks, each with 50 channels. Bank #1 has channels #1-#50, Bank #2 has channels #51-#100, and so on. Because of this- I like to organize my frequencies along side a channel that matches the car number (the exception being Castroneves this year) This way- I can quickly type in a channel number to jump directly to that car during a race. If you don’t care to do that, you can put all the cars on any channel, and just scan. You’ll still see the driver name when the scanner stops on a received signal.
The ONLY thing you need to input here, is the name, and the frequency. You can get those from my frequency list, a spotters guide, or any other source of frequencies. You can leave the columns of Modulation, CTCSS/DCS, Lockout, Delay, and Priority alone, unless you want to do some more advanced features.
BEFORE YOU PROGRAM YOUR SCANNER – make sure you have a backup of what was on it first. Writing the frequencies erases everything on your scanner, and replaces it with whatever is in the software. So if you had anything important on a bank that you weren’t planning on updating, it will be gone. So I suggest clicking the READ FROM SCANNER button first, and saving that file. Then import my file, or create your own from a blank template.
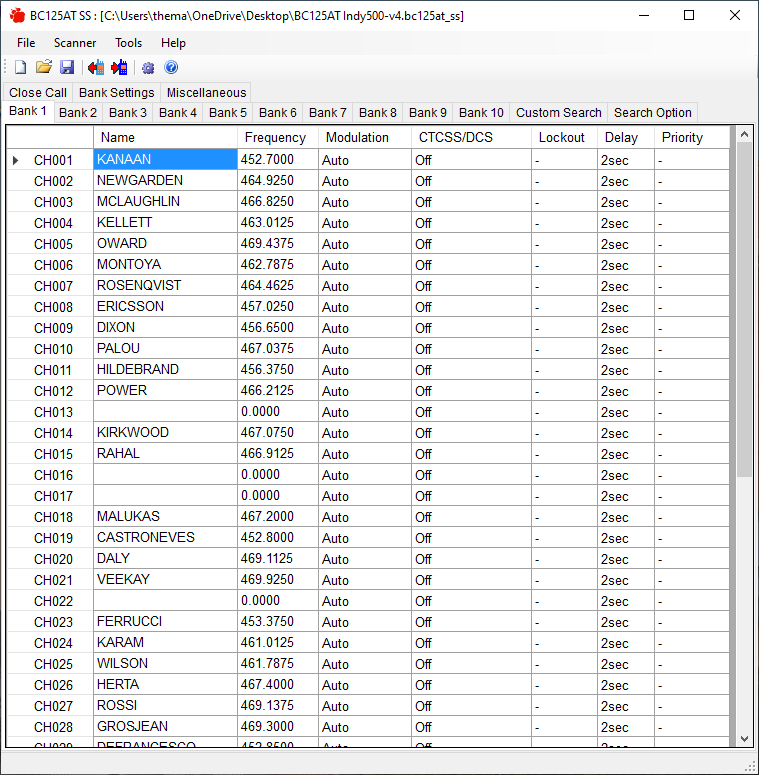
If you want copy-paste, you can grab the name and frequency direct from my list, and paste in to the BC125AT programmer, two fields at the same time. Just be sure to make your channel number match the car number from the list.
You can also use my BC125AT file, and have all of the programming already done! A little note on how my file is setup. Banks 1 & 2 are the drivers. This means car 12 is on channel 12. Easy. Banks 3 & 4 are their backup frequencies, if there are any. So car 12 has a backup frequency on channel 112. Banks 5 & 6 are empty. Bank 9 is local Indy ham repeaters and repeaters used by ham operators during severe weather for Marion County, and the counties directly to the west of Marion County. Finally, Bank 10 contains all of the “bonus” race-day frequencies. TV, Radio, PA, Safety, etc.
You can look at some of the other options, and see if there is anything you want to change to tailor the radio to your style, but this is all that is really needed at this point. Click the WRITE TO SCANNER button, and you’re ready to go to the track!

Programming Step-by-Step - By Hand on the Keypad
So you’ve made it to the track. Your scanner is programmed. You’re ready to go— and something is wrong. Maybe the scanner didn’t get all the info you wanted it to have. Maybe the guy you got the frequencies from got one wrong (I try not to!)
No problem! Programming by hand is a simple process. Especially if it’s just a few frequencies. If you’re trying to do the whole field of cars- well, I hope you got to the track early.
To add a channel:
- To put in a new frequency, first get to the channel you wish to program.
If you’re currently scanning, Press HOLD, type in a channel number you wish to add to, and press HOLD again.
If you were already held on a channel, just type in the number you wish to program, and HOLD. - Press FUNC and PGM (E)
- Select Enter Frequency from the menu by either pressing down on the dial, or by pressing E
- Type in the frequency you wish to add, such as 450.2575 Then press E. This will return you to the menu.
- Scroll to Edit Tag on the menu and select it by either pressing down on the dial, or by pressing E
- Use the dial to scroll through letters, numbers, and symbols. Use the <4 and 6> keys to move the cursor. When you’re done putting in the name of the channel, press E. This will return you to the menu.
- If you know the CTCSS/DCS info, you can enter it next – but this step is optional.
- I leave Modulation, Priority, and Delay to their defaults. (Auto, Off, 2 Sec)
- Scroll down to Exit and press down on the dial, or by pressing E
You’ve now added the frequency to that channel, and it will be scanned once you resume scanning the bank you’ve added it to!
To delete a channel:
- Go to the channel you wish to delete.
If you’re currently scanning, Press HOLD, type in a channel number you wish to add to, and press HOLD again.
If you were already held on a channel, just type in the number you wish to program, and HOLD. - Press FUNC and PGM (E)
- Use the dial to scroll down to Delete Channel. Select it by pressing the dial down, or pressing E
- Confirm by pressing E
- That channel is now deleted. Scroll down to Exit and press down on the dial, or by pressing E
4. scanning
Watch a video
Uniden Bearcat BC125AT Scanning
This section assumes that your scanner is programmed and ready to go. If you need to add a few more frequencies, or add them for the first time, check out the last part of Section 3 above.
Scanning at a racetrack with the BC125AT is amazing. The features and options make it quick and easy to do. This guide will start off assuming you’ve programmed your scanner with drivers and various bonus frequencies, and that you’ve put them in banks the same way, or similar to how I did.
- Press and hold the Power button (lower left) to turn the scanner on and off.
- To adjust the volume, press the Sel/Vol/Sql dial down, and adjust the volume. Press it again to return it to normal mode.
- Press the Scan button to begin scanning.
- Turn off banks you don’t want scanned by pressing the number associated with the bank. For my setup, I turn off 3-10. This way, I’m ONLY scanning the drivers cars. I may turn on banks 3 and 4, to ensure I’m checking backup car frequencies. To turn a bank back on again, just press the number.
- At any point, if you want to stay on a channel, just press Hold. The scanner will stay put until you press Scan again.
- To dial in a specific car, first press Hold to stop the scanning. Type in the channel you want to change to (example, 12) and press Hold again. You are now listening to car #12. Press Scan to resume scanning all frequencies.
- If a channel is getting digital noise, random static, and no usable audio- you can press the Lockout button. This will temporarily remove it from the frequencies that get scanned. Restarting the scanner will put this frequency back in rotation. To remove it permanently, press the Lockout button twice while on the offending channel. Review the manual for how to remove a channel from permanent lockout.
- You can press Func + 3 (wx) to listen in to the local weather report.

Memory Banks
Here is how I have laid out the memory banks in my config file.
Bank 1-2 Cars
Bank 3-4 Car Backups (if known)
Bank 9 – Local Indy Ham Repeaters, & Emergency Comms during weather
Bank 1(0) – “Bonus” race-day frequencies. TV/Radio/Safety/PA/etc
This leaves 5, 6 and 7 wide open for your own, or to program in things as needed on race day.
If you need to add or remove channels while at the track, scroll up and look at Section 3- Programming Step-by-Step – By Hand on the Keypad.
Troubleshooting
No signal / Garbage sounds
There are a few reasons you might be having problems while at the track. #1 is that (and I’m not 100% on the rules here) cars may not have to broadcast on open analog channels during some practices, setups, etc. If it isn’t during the race, you might hear nothing, jumbled encrypted garbage, etc. This *might* be normal, and you might just need to wait until the race or qualification run.
If you have set the CTCSS/DCS for a channel (and if you’re using my config, you probably are) and the tone-code is WRONG or has CHANGED– then you might get a silent channel. These tones are setup so that your radio INGNORES any transmissions that don’t have that un-hearable tone also going out with the speech. Sometimes these change, and sometimes there are typos on this end. Either way, if your favorite driver is 100% silent, the tone may be set incorrectly. The easiest way to remedy this is to follow this procedure:
- Go to the channel that is silent. Press Hold, and then enter the channel (car) number.
- Press Pgm/E to enter the Channel menu.
- Scroll to “Set CTCSS/DCS” and press Pgm/E again.
- At this point, I recommend changing it to OFF. There are ways to re-scan and try to find it / set it again, but I would just turn it off to see if that fixes the issue first. Once you’ve set it to OFF, press Pgm/E again.
If you still can’t hear your driver, it’s worth checking on the alternate frequenices. It could be they were having radio malfunctions in the car or garage, or had to change for other reasons. Those alternate channels are in my Banks 3/4, or listed on the page at https://themann00.com/latest-frequencies
Bearcat Tone Tutorial (click-to-expand)
If you are using the Bearcat BC125AT and you find that you can't hear a driver, it could be one of two things.
First, check the secondary frequency for the driver. They might have had to switch to their secondary frequency for some reason.
If you don't hear them on that frequency either, you might have a tone-squelch problem.
Tone-squelch is designed to help keep out all transmissions that don't include a particular additional "unbearable" tone or digital signal. This prevents little kids on walkie talkies, drive-thru speakers, and other random things from causing static or other noise from being a distraction to you or the race car drivers. It's a great feature. But if it has been programmed incorrectly, miscopied by me, or if the team had to change it after you programed your scanner, you will only have silence on that frequency. Here are two ways to fix it.
1- remove the squelch, and hear everything again:
- Go to the channel that isn’t working
- Press Func and then Pgm/E
- Scroll down to Set CTCSS/DCS, and press Pgm/E
- Scroll up to Off and press Pgm/E
- Scroll down to Exit and press Pgm/E
- and now it’s turned off, and you’ll hear everything on that frequency!
2- put the scanner in search mode, note the found tone, and reprogram it. note- this will temporarily open it up, as above, but lead you to locking it back down again.
- Go to the channel that isn’t working
- Press Func and then Pgm/E
- Scroll down to Set CTCSS/DCS and press Pgm/E
- Scroll down to CTCSS/DCS Search and press Pgm/E
- Scroll down to Exit and press Pgm/E
- Listen and watch your display. When there is a transmission between the driver and pit, you will see the Tone information flash below the frequency number on the display of the scanner. Remember this information or write it down. Also, note if the number has a decimal in it or not.
- Now press Func and then Pgm/E
- Scroll down to Set CTCSS/DCS and press Pgm/E
- If the number that was flashing had a decimal in it, select CTCSS, if it did not have a decimal in it, select DCS, and press Pgm/E
- Scroll through the list of all those numbers until you find the one that was flashing and press Pgm/E
- Scroll down to Exit, and press Pgm/E
- You have now reprogrammed the Tone for that channel to the correct one for your driver.
More from TheMann00.com
From the Blog
Life of Horace Mann by Mary Peabody Mann (1865)
Mary Peabody Mann’s poignant biography traces Horace’s journey from a modest Franklin, Massachusetts farm, son of farmer Thomas Mann and Rebecca Stanley, to Brown University scholar, state legislator, and Board of Education secretary. Amid losses like brother Stephen’s drowning and first wife Charlotte’s death, he rejected Calvinism for moral education reforms, championing free schools and asylums. Structured with letters and speeches, this 1865 memoir humanizes the reformer during America’s industrial dawn.
Ancestry, Education, and a Family Connection to Horace Mann
Horace Mann helped shape the American public school system. A documented family lineage shows we share a common 17th century ancestor, connecting history to the present.
The 996 Work Culture is outlawed in China. Why not here?
The “996” schedule (9 am to 9 pm, six days a week) is creeping into Silicon Valley culture under the guise of hustle. While startups promise massive equity payouts, the reality is often a recipe for severe burnout, health issues, and empty pockets. Even China has outlawed this practice, so why are we normalizing it?
Why H.R. 1094 and S. 459 Must Pass: Empowering Hams in HOAs for Real Emergency Readiness
Amateur radio saves lives in disasters, but HOAs often block the antennas needed for practice. H.R. 1094 and S. 459 fix that with reasonable accommodations, balancing safety and emergency prep. Hams and neighbors: act now at send-a-letter.org/hoa/.
The Contrarian We Need
Michael Burry doesn’t do interviews. The hedge fund manager who famously predicted the 2008 housing crisis has spent most of the past two decades avoiding the media spotlight. So when he sat down with Michael Lewis for a rare conversation and revealed he’s shorting AI companies like NVIDIA and Palantir, people listened. His reasoning cuts through the hype: AI infrastructure spending massively exceeds actual revenues. For someone like me, an AI evangelist who genuinely believes we’re watching something transformative unfold, Burry’s position should feel like an attack. It doesn’t. It feels necessary. Here’s why his skepticism matters, even if you’re bullish on AI.
AI Bubble Warning: How Tech’s Financing Mirrors 2008 | Pattern Recognition Guide
Nvidia is giving OpenAI $100 billion so OpenAI can buy Nvidia’s chips. It’s not illegal. It’s not hidden. But it creates a fundamental problem: we can’t tell what real demand for AI actually is because much of the spending is circular — companies funding their own customers to maintain the appearance of booming sales. Sound familiar? It should.